ChatGPTにアクセスできない環境や、アカウントを持っていない人にChatGPTを使ってもらうにはどうしたらよいでしょうか。
ChatGPTのAPIを活用し、GAS(Google Apps Script)でWebアプリケーションを構築します。
これにより、ブラウザ上で動作する簡易的なChatGPTチャットボットを作成できます。
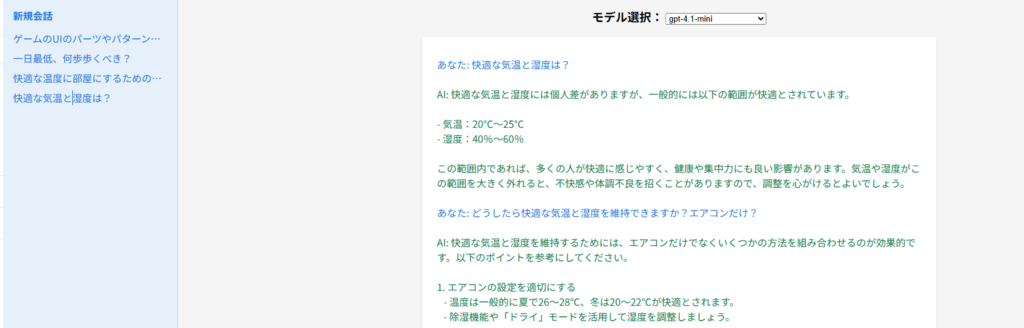
Googleアカウントがあれば、ChatGPTのアカウントがなくても利用可能です。
GASで動くChatGPTの作り方
UIと処理ロジックはGASで構築し、ログ保存にはGoogleスプレッドシートを使用します。
また、ChatGPTを利用するためにOpenAIのAPIキーを発行します。
これらの連携により、簡易的なチャットボット環境を構築できます。
ChatGPTのAPIキーの発行
まずはOpenAIの管理画面からChatGPTのAPIキーを発行します。
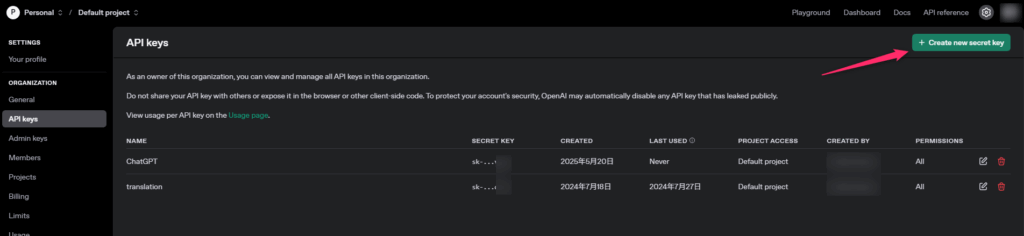
発行されたシークレットキーは再表示できない場合があるため、必ず控えておきます。
スクリプトプロパティに登録
控えたAPIのシークレットキーを、GASの「スクリプトプロパティ」に登録します。
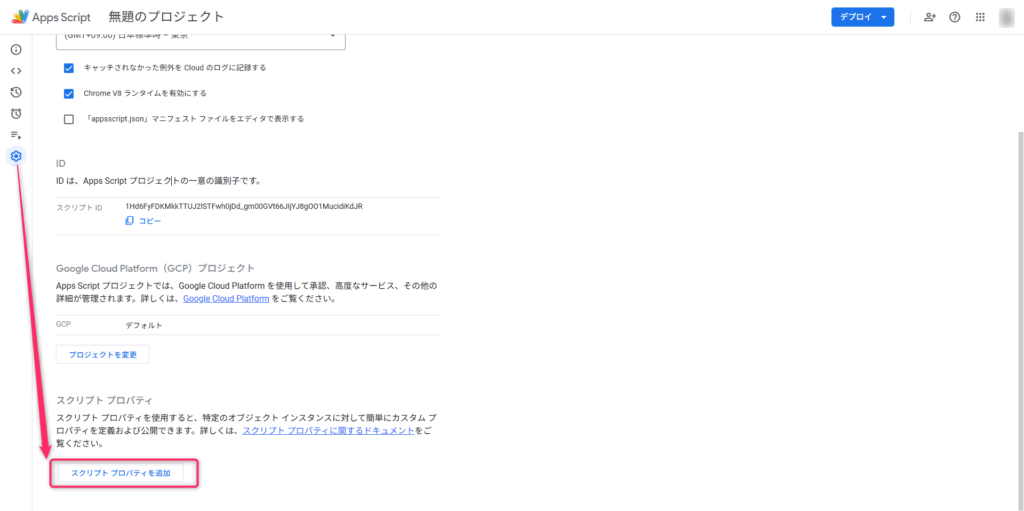
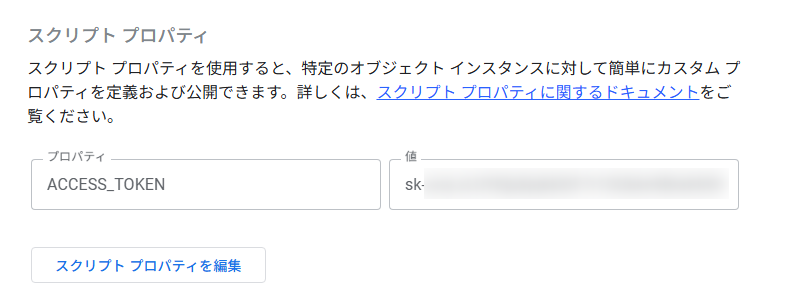
今回はプロパティ名を「ACCESS_TOKEN」として設定しました。
「値」の入力欄に先ほどのシークレットキーを設定して保存します。
ログ用のスプレッドシートを作成
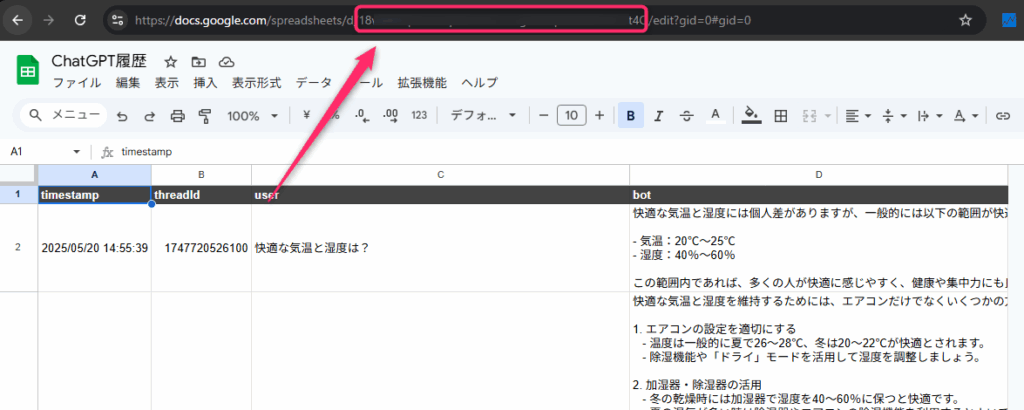
対話履歴を記録するためのGoogleスプレッドシートを新規作成します。
作成後、スプレッドシートのID(URL内の該当部分)とシート名を控えておきます。
※控えたIDとシート名は、後述するmain.gs内の設定箇所に記述します。
Webアプリの作成
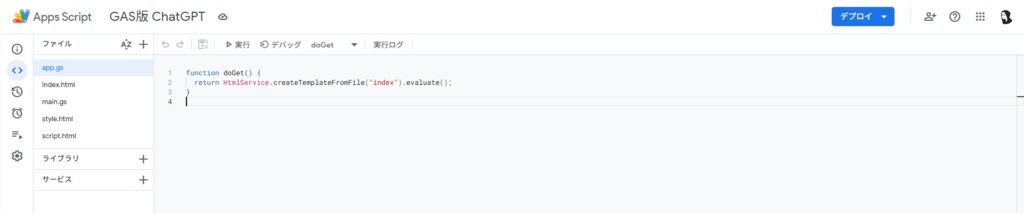
GASエディタ上に必要な各ファイルを構成し、コードを記述していきます。
| ファイル | 備考 |
|---|---|
| app.gs | HTMLファイルを読み込み、Webアプリケーションとして表示可能な形式に変換します。 |
| index.html | 画面のUI(HTML構造)を記述します。 |
| style.html | 画面デザインを定義するCSSを記述します。 |
| script.html | 画面の挙動や非同期通信を制御するフロントエンドJavaScriptを記述します。 |
| main.gs | ChatGPT APIの呼び出しやスプレッドシート連携を行うサーバー側処理を記述します。 |
app.gs
Webアプリとしてアクセスされた際に、HTMLを出力するための初期化処理を記述するファイルです。
function doGet() {
  return HtmlService.createTemplateFromFile("index").evaluate();
}
index.html
チャット画面の基本構造を定義するファイルです。
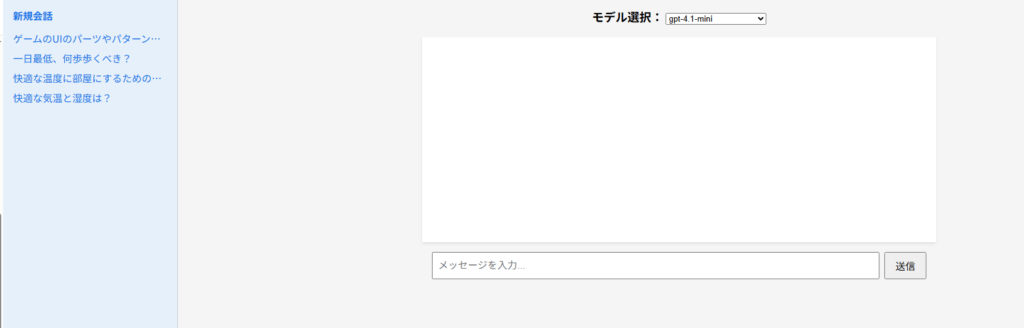
画面左側に履歴などを表示するサイドバーを配置し、中央に対話メッセージ領域を設けています。
また、外部ファイル化したCSSとJavaScriptを読み込む記述を含めています。
<!DOCTYPE html>
<html>
  <head>
    <base target="_top">
    <?!= HtmlService.createHtmlOutputFromFile("style").getContent(); ?>
  </head>
  <body>
    <div class="sidebar">
      <h2 onclick="startNewConversation()">新規会話</h2>
      <div id="historyList"></div>
    </div>

    <div class="main">
      <div class="header">
        <label for="modelSelect">モデル選択:</label>
        <select id="modelSelect">
          <option value="gpt-4.1">gpt-4.1</option>
          <option value="gpt-4.1-mini" selected>gpt-4.1-mini</option>
          <option value="gpt-4.1-nano">gpt-4.1-nano</option>
          <option value="o4-mini">o4-mini</option>
          <option value="gpt-4o">gpt-4o</option>
          <option value="gpt-4o-mini">gpt-4o-mini</option>
          <option value="gpt-4o-realtime-preview">gpt-4o-realtime-preview</option>
          <option value="gpt-4o-mini-tts">gpt-4o-mini-tts</option>
        </select>
      </div>
      <div class="chat-box" id="chatLog"></div>
      <div class="input-area">
        <textarea id="inputText" rows="5" placeholder="メッセージを入力..."></textarea>
        <button onclick="sendMessage()">送信</button>
      </div>
    </div>
    <?!= HtmlService.createHtmlOutputFromFile("script").getContent(); ?>
  </body>
</html>
さらに、プルダウンから利用するChatGPTのモデルを選択できる仕様にしています。
利用可能なモデルの種類や指定名については、公式ドキュメント等から確認できます。
style.html
チャットUI全体のレイアウトや配色を調整するCSSファイルです。
<style>
  body {
    font-family: sans-serif;
    background-color: #f5f5f5;
    margin: 0;
    padding: 0;
    display: flex;
  }
  .sidebar {
    width: 250px;
    background-color: #e6f0fa;
    border-right: 1px solid #ccc;
    padding: 1em;
    height: 100vh;
    overflow-y: auto;
  }
  .sidebar h2 {
    font-size: 1em;
    margin-top: 0;
    cursor: pointer;
    color: #1a73e8;
  }
  .sidebar .history-item {
    margin: 0.5em 0;
    color: #1a73e8;
    cursor: pointer;
    white-space: nowrap;
    overflow: hidden;
    text-overflow: ellipsis;
  }
  .main {
    flex-grow: 1;
    display: flex;
    flex-direction: column;
    align-items: center;
    padding: 1em;
  }
  .header {
    font-size: 1.2em;
    font-weight: bold;
    margin-bottom: 1em;
  }
  .chat-box {
    width: 100%;
    max-width: 800px;
    background-color: #fff;
    padding: 1em;
    box-shadow: 0 2px 5px rgba(0,0,0,0.1);
    min-height: 300px;
    margin-bottom: 1em;
    overflow-y: auto;
  }
  .input-area {
    display: flex;
    width: 100%;
    max-width: 800px;
  }
  textarea#inputText {
    flex: 1;
    padding: 0.5em;
    font-size: 1em;
    resize: vertical;
  }
  button {
    padding: 0.5em 1em;
    margin-left: 0.5em;
    font-size: 1em;
  }
  .message {
    margin: 0.5em 0;
    padding: 0.5em;
  }
  .user {
    color: #1a73e8;
  }
  .bot {
    color: #0b8043;
    white-space: pre-wrap;
  }
</style>
続いて、通信処理を担うmain.gsとフロントエンド処理のscript.htmlを実装します。
すべてのコードを実装したあと、Webアプリとしてデプロイすることでブラウザからアクセス可能になります。
ここから先の詳細な実装コードは有料コンテンツとなります。
Googleスプレッドシートの他の自動化操作については、まとめ記事をご確認ください。

script.html
フロントエンド側のJavaScriptを記述するファイルです。
送信ボタンの押下時にGAS側を呼び出す処理や、サイドバーへの対話履歴の描画を担当します。
<script>
  let conversation = [];
  let conversationId = Date.now().toString();

  const chatLog = document.getElementById("chatLog");
  const input = document.getElementById("inputText");
  const historyList = document.getElementById("historyList");

  function startNewConversation() {
    conversation = [];
    conversationId = Date.now().toString();
    chatLog.innerHTML = "";
    input.value = "";
    loadSidebar();
  }

  function appendMessage(role, content) {
    const div = document.createElement("div");
    div.className = `message ${role}`;
    div.innerHTML = `${role === 'user' ? 'あなた' : 'AI'}: ${content}`;
    chatLog.appendChild(div);
  }

  function groupByThread(data) {
    const grouped = {};
    data.forEach(item => {
      if (!grouped[item.thread]) grouped[item.thread] = [];
      grouped[item.thread].push(item);
    });
    return grouped;
  }

  function loadSidebar() {
    google.script.run
      .withSuccessHandler(function(data) {
        historyList.innerHTML = "";
        if (!Array.isArray(data) || data.length === 0) {
          historyList.textContent = "履歴がありません";
          return;
        }

        const grouped = groupByThread(data);
        Object.entries(grouped).reverse().forEach(([threadId, messages]) => {
          const div = document.createElement("div");
          div.className = "history-item";
          div.textContent = messages[0].user;
          div.onclick = () => loadHistoryFromThread(messages);
          historyList.appendChild(div);
        });
      })
      .withFailureHandler(err => {
        console.error("履歴取得に失敗:", err);
        alert("履歴の読み込みに失敗しました。");
      })
      .getHistoryFromSheetWithThreads();
  }

  function loadHistoryFromThread(messages) {
    conversation = [];
    conversationId = messages[0].thread;
    chatLog.innerHTML = "";

    messages.forEach(msg => {
      conversation.push({ role: 'user', content: msg.user });
      appendMessage('user', msg.user);
      conversation.push({ role: 'assistant', content: msg.bot });
      appendMessage('bot', msg.bot);
    });
  }

  function sendMessage() {
    const userMsg = input.value.trim();
    if (!userMsg) return;

    appendMessage('user', userMsg);
    input.value = "";

    conversation.push({ role: 'user', content: userMsg });

    const modelSelect = document.getElementById("modelSelect");
    const selectedModel = modelSelect.value;

    google.script.run
      .withSuccessHandler(function(response) {
        appendMessage('bot', response);
        conversation.push({ role: 'assistant', content: response });
        loadSidebar();
      })
      .askChatGPTWithModel(userMsg, conversationId, selectedModel);
  }

  window.onload = loadSidebar;
</script>
main.gs
ChatGPTのAPIへのリクエスト送信やスプレッドシートへの記録処理を記述するファイルです。
冒頭の設定変数に、事前準備で控えたスプレッドシートのIDとシート名を記述します。
ChatGPTのAPIを呼び出すための処理を記述します。
const SHEET_ID = "xxxxxxxxxxxxxxxxxxxxxxxxxxx";
const SHEET_NAME = "シート1";

function askChatGPTWithModel(userInput, threadId, modelName) {
  const apiKey = PropertiesService.getScriptProperties().getProperty("ACCESS_TOKEN");

  const payload = {
    model: modelName || "gpt-4o",
    messages: [
      { role: "system", content: "あなたは有能なメールアシスタントです。" },
      { role: "user", content: userInput }
    ]
  };

  const options = {
    method: "post",
    contentType: "application/json",
    headers: {
      Authorization: "Bearer " + apiKey
    },
    payload: JSON.stringify(payload),
    muteHttpExceptions: true
  };

  try {
    const response = UrlFetchApp.fetch("https://api.openai.com/v1/chat/completions", options);
    const result = JSON.parse(response.getContentText());

    if (result.error) {
      return "エラー: " + result.error.message;
    }

    const reply = result.choices[0].message.content.trim();
    saveToSpreadsheet(threadId, userInput, reply);
    return reply;
  } catch (e) {
    return "通信エラー: " + e.message;
  }
}

function saveToSpreadsheet(threadId, userInput, botResponse) {
  const sheet = SpreadsheetApp.openById(SHEET_ID).getSheetByName(SHEET_NAME);
  sheet.appendRow([new Date(), threadId, userInput, botResponse]);
}

function getHistoryFromSheetWithThreads() {
  const sheet   = SpreadsheetApp.openById(SHEET_ID).getSheetByName(SHEET_NAME);
  const lastRow = sheet.getLastRow();
  if (lastRow < 2) return [];

  // 2行目(= データの先頭)から最終行まで一気に取得
  const data = sheet.getRange(2, 1, lastRow - 1, 4).getValues();
  const tz   = Session.getScriptTimeZone();

  return data.map(r => ({
    timestamp: Utilities.formatDate(r[0], tz, "yyyy/MM/dd HH:mm:ss"),
    thread   : r[1],
    user     : r[2],
    bot      : r[3],
  }));
}
デプロイして表示
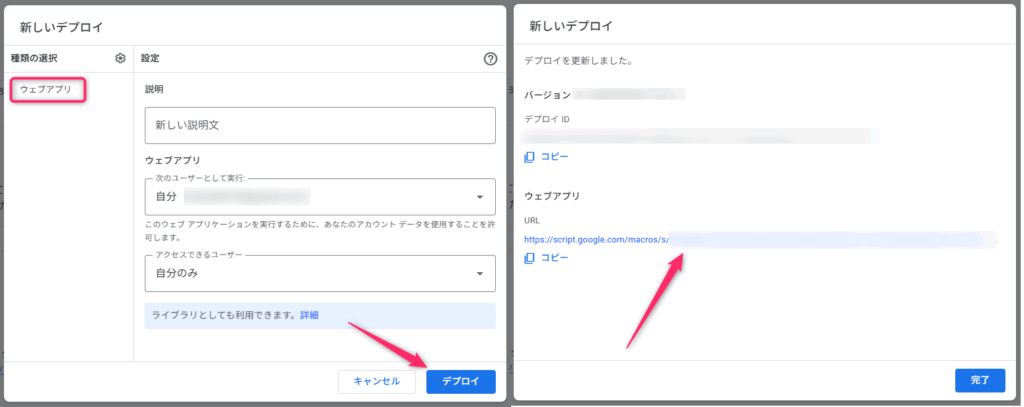
すべてのコードの記述が完了したら、GASエディタ右上の「デプロイ」から「新しいデプロイ」を実行してWebアプリを公開します。
デプロイ完了後に発行されるウェブアプリのURLをクリックして開きます。
入力欄にメッセージを送信し、正常に応答が返ってくるかテストしてみましょう。
以上で、GASを使ったChatGPT風チャットボットの構築手順は完了です。
この記事で紹介しているコードは、GitHubのMOTOKI-LLC/cg-method-codeにもまとめています。
外部のサービスと連携する記事は、ほかにもあります。