Photoshopの拡張機能のカスタムパネルを試してみました。(※Photoshop CC 2014以降で作成可能です)
これで自作ツールを並べることができますし、htmlで構成されているのでcssでの見た目も調整できるので、かなりテンション上がります!
Photoshop拡張機能でカスタムパネルを表示する方法
まずは環境構築をしてしまいましょう!
[timeline]
[tl label=’STEP.1′ title=’Bracketsのインストール’]
下記のURLからAdobeが開発のテキストエディタをインストール
http://brackets.io/
[/tl]
[tl label=’STEP.2′ title=’>Creative Cloud Extension Builder for Bracketsのインストール’]
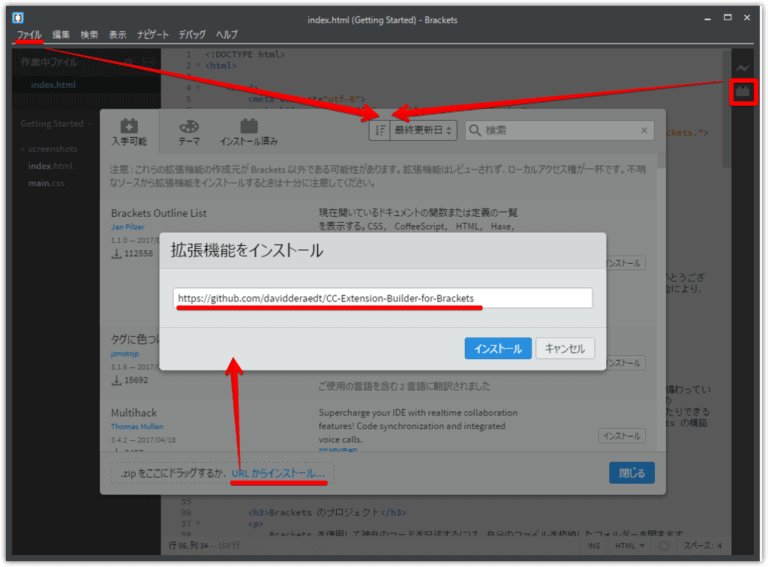
Bracketsを起動して、ファイル>拡張機能マネージャー>URLからインストールから下記のURLをコピペして、インストール
[/tl]
[tl label=’STEP.3′ title=’>サンプルの拡張機能を作成’]
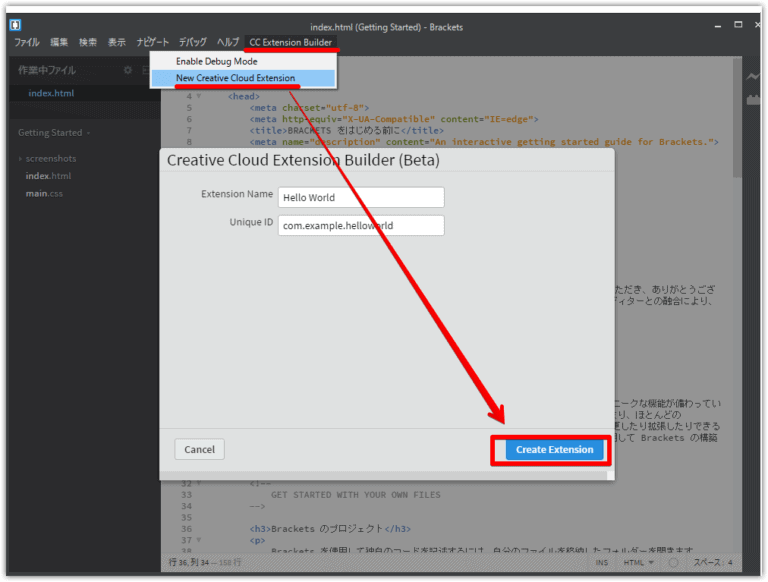
メニューにCC Extension Builderが追加されるので、そこからNew Creative Cloud Extension>Create Extensionを実行
[/tl]
[tl label=’STEP.4′ title=’>バージョンの記述の変更’]
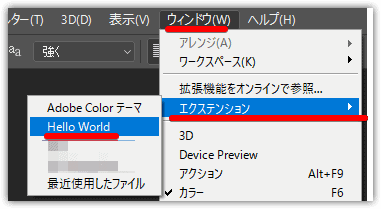
このままPhotoshop2017を立ち上げても、ウインドウ>エクステンションの中にHello Worldという名前の拡張機能が読み込まれていません。
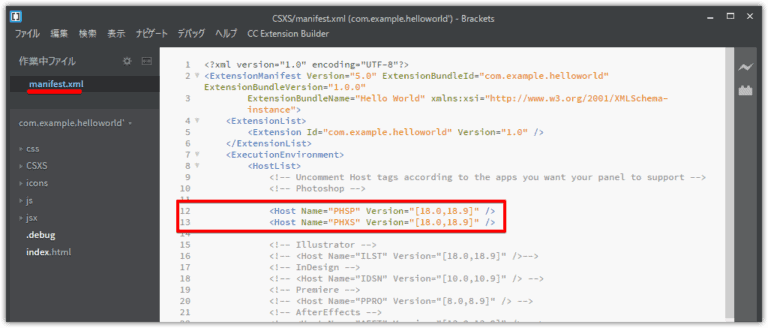
まずは、Bracketsに表示されているmanifest.xmlを編集します。
C:Users\ユーザー名\AppData\Roaming\Adobe\CEP\extensions\com.example.helloworld'CSXSmanifest.xml
<Host Name="PHXS" Version="[15.0,15.9]" />

<Host Name="PHSP" Version="[15.0,15.9]" />
↓
<Host Name="PHSP" Version="[18.0,18.9]" />

<Host Name="PHXS" Version="[18.0,18.9]" />
に書き換えます。
※ バージョン参考
・CC2017 Version 18
・CC2015 Version 16
・CC2014 Version 15
※バージョンを[18.0,18.9]と2つ書いているのはその2つのバージョン内という意味
[/tl]
[tl label=’STEP.5′ title=’>署名の設定の必要’]
Photoshop2017を立ち上げてウインドウ>エクステンションの中にHello Worldという名前の拡張機能が読み込まれているのを確認します。
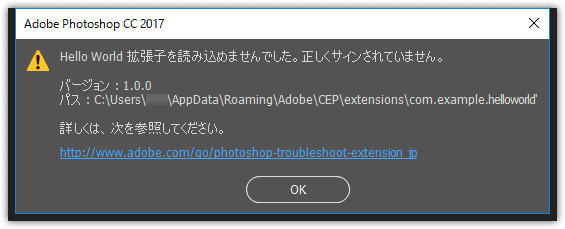
ただし、このまま実行しても拡張子を読み込めませんでした。正しくサインされていません。という警告がでます。
[/tl]
[tl label=’STEP.5′ title=’>無署名を許可する’]
レジストリを調整して無署名を許可します。
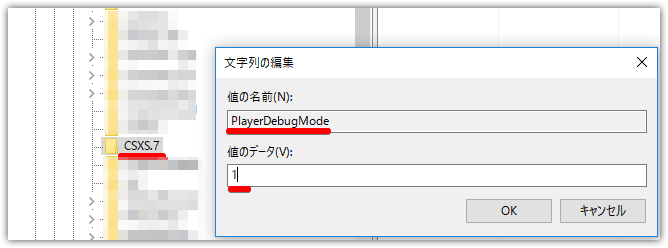
- Win+Rからregeditを入力して、レジストリ エディターを起動
- HKEY_CURRENT_USER/Software/Adobe/CSXS.7まで移動して、右クリックから新規>文字列値から、名前をPlayerDebugMode、値を1に
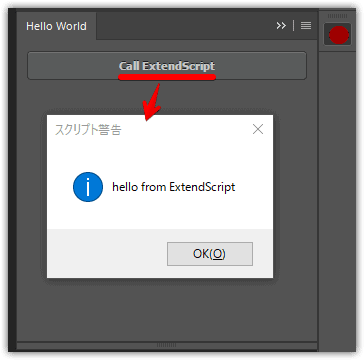
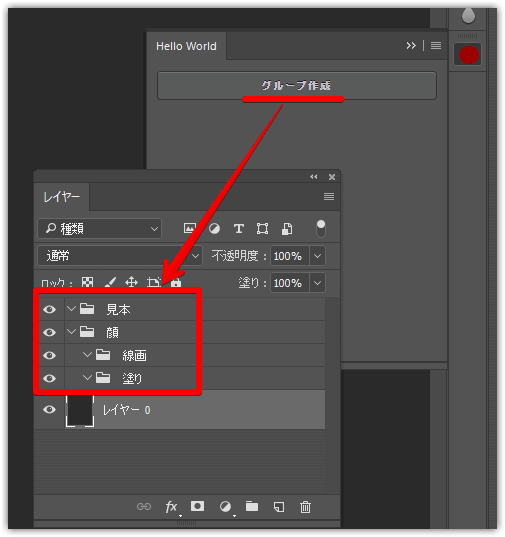
もう一度、Photoshop2017を立ち上げてウインドウ>エクステンションの中にHello Worldを選択すると、カスタムパネルが起動し、またボタンも機能します。
[/tl]
[/timeline]
.reg作成
.reg作成してみました。
メモ帳に下記のコードをコピペして、PlayerDebugMode_on.regみたな感じで適当な命名+拡張子(reg)に変更。
実行するとレジストリに追記されます。
Windows Registry Editor Version 5.00
[HKEY_CURRENT_USERSoftwareAdobeCSXS.7]
"PlayerDebugMode"="1"
つづいて署名を作成します。
[timeline]
[tl label=’STEP.1′ title=’レジストリ調整’]
自分だけで、完結する場合はレジストリ調整して無署名でよいのですが。
レジストリがいじれない場合や他人に渡す場合などは、署名を作成すれば、警告がでてこなくなります。
[/tl]
[tl label=’STEP.2′ title=’CC Extensions Signing Toolkitのダウンロード’]
下記のURLからCC Extensions Signing Toolkitをダウンロードします。(こちらが最新のようです)
[/tl]
[tl label=’STEP.3′ title=’ZXPSignCmd’]
中身のZXPSignCmd.exeを好きな場所に保存します。
[/tl]
[tl label=’STEP.4′ title=’コマンドプロンプトの起動’]
Win+Rからcmdを入力して、コマンドプロンプトを起動します。
ここで、単純にZXPSignCmd.exeを入力すると、全てのコマンドが表示されます。
[open title=’ZXPSignCmd.exe’]
ZXPSignCmd -sign <inputDirectory> <outputZxp> <p12> <p12Password> [options]
options:
-tsa <timestampURL> - will attempt to timestamp the ZXP using supplied timestamp server. For example, https://timestamp.geotrust.com/tsa
ZXPSignCmd -verify <zxp>|<extensionRootDirectory> [options]
options:
-certInfo - will print out information about certificates (including timestamp and certificate revocation information)
-skipOnlineRevocationChecks - will skip online checks for certificate revocation (certificate revocation checks only happen with -certInfo flag set)
-addCerts <certificate1> <certificate2>... - will verify certificate chain and assess whether or not DER encoded certificates passed in are included
ZXPSignCmd -selfSignedCert <countryCode> <stateOrProvince> <organization> <commonName> <password> <outputPath.p12> [options]
options:
-locality <locality> -orgUnit <orgUnit> -email <email> -validityDays <validityDays> - are optional attributes for self-signed p12 certificates
```ZXPSignCmd -sign <inputDirectory> <outputZxp> <p12> <p12Password>```
[/open]
[/tl]
[tl label=’STEP.5′ title=’署名を作成’]
ZXPSignCmd -selfSignedCert
[ZXPSignCmd.exeのパス] -selfSignedCert [国] [地域] [組織] [名前] [パスワード] [保存するファイル名]
例
C:Users\ユーザー名\ZXPSignCmd.exe -selfSignedCert JP Tokyo My MIN test custompanel.test
[/tl]
[tl label=’STEP.6′ title=’パッケージ化’]
ZXPSignCmd -sign
[ZXPSignCmd.exeのパス] -sign [Extensionのソースフォルダのパス] [保存するzxpのパス] [署名のパス] [署名のパスワード]
例
C:Users\ユーザー名\ZXPSignCmd.exe -sign "C:Users\ユーザー名\AppData\Roaming\Adobe\CEP\extensions\com.example.helloworld'" custompanel.zxp custompanel.test test
custompanel.zxpが作成されます。
[/tl]
[tl label=’STEP.2′ title=’解凍’]
ちなみに.zxpはただのZIPファイルなので、試しに解凍してみます。
META-INFフォルダと言うものが追加されていて、その中にsignatures.xmlというファイルが署名になります。

[/tl]
[/timeline]
最後にカスタムパネルから設定した機能を実行してみましょう!
[timeline]
[tl label=’STEP.1′ title=’JSXの編集’]
Hello Worldのサンプルデータ
C:Users\ユーザー名\AppData\Roaming\Adobe\CEP\extensions\com.example.helloworld'
から、カスタマイズしてみます。
jsx > hostscript.jsxの中身を以前、CGメソッドで作成したスクリプトを置換します。
function makeGroup(){
//顔
var layer_face = app.activeDocument.layerSets.add();
var layer_face_paint = layer_face.layerSets.add();
var layer_face_line = layer_face.layerSets.add();
layer_face.name = '顔';
layer_face_paint.name = '塗り';
layer_face_line.name = '線画';
//見本
var layer_template = app.activeDocument.layerSets.add();
layer_template.name = '見本';
}
[/tl]
[tl label=’STEP.2’JSの編集’]
js > main.js から先程の関数(makeGroup)を記述します。
(function () {
'use strict';
var csInterface = new CSInterface();
function init() {
themeManager.init();
$("#btn_test").click(function () {
csInterface.evalScript('makeGroup()');
});
}
init();
}());
関数がわからない時
evalFile関数を使用して、もう1スクリプト間にかまします。
function AAA() {
var external = $.evalFile("C:/Users/AAA.jsx");
}
[/tl]
[tl label=’STEP.3’HTMLの編集’]
index.htmlを編集します。今回はボタン名だけ変えてみます。
<button id="btn_test" class="topcoat-button--large hostFontSize">グループ作成</button>
あとはお好みでCSSなり画像なり入れて、パネルをカスタマイズしていきます。
[/tl]
[tl label=’STEP.4’カスタムパネルの実行’]
最後にテスト!
[/tl]
[/timeline]
###[ 簡易版]拡張機能でカスタムパネルを表示する方法
要素を最小限にして、カスタムパネルを表示させてみます。
[timeline]
[tl label=’STEP.1′ title=’下記のパスにTESTというフォルダを作成’]
%USERPROFILE%\AppData\Roaming\Adobe\CEP\extensions
[/tl]
[tl label=’STEP.2′ title=’フォルダを作成’]
階層下にCSXSというフォルダを作成
さらにCSXSの中に
manifest.xml
というファイルを作成
[/tl]
[tl label=’STEP.3′ title=’コードの書き換え’]
manifest.xmlの中身を下記のコードをコピペ
[open title=’manifest.xml’]
<?xml version="1.0" encoding="UTF-8"?>
<ExtensionManifest Version="5.0" ExtensionBundleId="com.example.test" ExtensionBundleVersion="1.0"
ExtensionBundleName="TEST" xmlns:xsi="http://www.w3.org/2001/XMLSchema-instance">
<ExtensionList>
<Extension Id="com.example.test" Version="1.0" />
</ExtensionList>
<ExecutionEnvironment>
<HostList>
<!-- Uncomment Host tags according to the apps you want your panel to support -->
<!-- Photoshop -->
<Host Name="PHSP" Version="[18.0,18.9]" />
<Host Name="PHXS" Version="[18.0,18.9]" />
</HostList>
<LocaleList>
<Locale Code="All" />
</LocaleList>
<RequiredRuntimeList>
<RequiredRuntime Name="CSXS" Version="5.0" />
</RequiredRuntimeList>
</ExecutionEnvironment>
<DispatchInfoList>
<Extension Id="com.example.test">
<DispatchInfo >
<Resources>
<MainPath>./index.html</MainPath>
<ScriptPath>./jsx/hostscript.jsx</ScriptPath>
</Resources>
<Lifecycle>
<AutoVisible>true</AutoVisible>
</Lifecycle>
<UI>
<Type>Panel</Type>
<Menu>TEST</Menu>
<Geometry>
<Size>
<Height>300</Height>
<Width>300</Width>
</Size>
<!--<MinSize>
<Height>550</Height>
<Width>400</Width>
</MinSize>
<MaxSize>
<Height>550</Height>
<Width>400</Width>
</MaxSize>-->
</Geometry>
<Icons>
<Icon Type="Normal">./icons/suimin.png</Icon>
</Icons>
</UI>
</DispatchInfo>
</Extension>
</DispatchInfoList>
</ExtensionManifest>
[/open]
以上で、manifest.xmlだけでも、Photoshopを起動すると拡張機能にTESTのパネルが追加されています。
[/tl]
[tl label=’STEP.4′ title=’アイコン画像を追加’]
さらにiconsフォルダを作成して、その中に画像(suimin.png)を追加
[/tl]
[tl label=’STEP.5′ title=’index.htmlを作成’]
index.htmlを作成、中身は下記のコードに
<html>
<head>
</head>
<img src="icons/suimin.png">
</html>
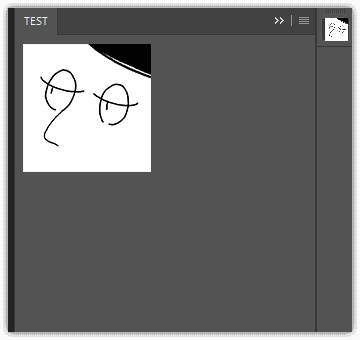
パネルの中に画像が表示できました。
ちゃんとデータの役割を理解すると、カスタムパネルの作成も簡単に感じます。
[/tl]
[/timeline]
拡張機能のカスタムパネルのHTML・CSSの調整方法
ここからは応用編です。CSS等を追加して見た目や機能を追加していきます。
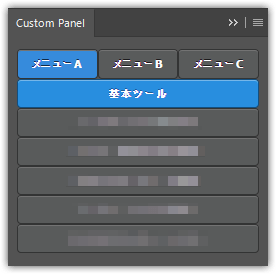
適当にスクリプトを追加して、タブをつけて、中はアコーディオン式に展開できるように変更してみました。
JSX(hostscript.jsx)
hostscript.jsx
から使う機能のスクリプトを読み込んでいるのですが、さらに外部参照にしました。
[timeline]
[tl label=’STEP.1′ title=’フォルダ作成’]
同階層にscriptsフォルダを作成して、使う機能(AAA.jsx)のスクリプトを置く
[/tl]
[tl label=’STEP.2′ title=’パスの追記’]
hostscript.jsxには#include "/c/Users/ユーザー名/AppData/Roaming/Adobe/CEP/extensions/custompanel/jsx/scripts/AAA.jsx"とだけ記述
※ 相対パスだと上手く行かなかったので、絶対パスにしています。
[/tl]
[/timeline]
JavaScript(main.js)
ボタンを押した時に機能が動くような記述を追加するだけ
  $("#AAA").click(function () {
csInterface.evalScript('AAA()');
});
HTML(index.html)
[timeline]
[tl label=’STEP.1′ title=’アコーディオンを追加’]
最初から展開する場合は
[/tl]
[tl label=’STEP.2′ title=’タブを追加’]
ヘッド<head></head>間に下記のコードを追加
<script type="text/javascript" src="https://ajax.googleapis.com/ajax/libs/jquery/2.1.3/jquery.min.js"></script><script>
$(function() {
$(".tab li").click(function() {
var num = $(".tab li").index(this);
$(".tabContent").removeClass('active');
$(".tabContent").eq(num).addClass('active');
$(".tab li").removeClass('active');
$(this).addClass('active')
});
});
</script>ボディ<body></body>の中の先頭に下記のコードを追加
[/tl]
[tl label=’STEP.3′ title=’タブの中身’]
先頭は
div class="tabContent active"></div>
残りは
<div class="tabContent"></div>
で区切る
※CSSも設定しないと上手くタブが作動しません。
[/tl]
[/timeline]
CSS(styles.css)
参照しているスタイルシートはこちら
topcoat-desktop-dark.min.cssを使用。
[timeline]
[tl label=’STEP.1′ title=’ボタンのラベルを中央合わせに’]
div { text-align : center ; }
[/tl]
[tl label=’STEP.2′ title=’ボタンのサイズをまとめて記述’]
.topcoat-button--large--cta{
width: 100%;
}
.topcoat-button--large{
width: 100%;
}
[/tl]
[tl label=’STEP.2′ title=’タブ関係’]
[open title=’タブ関係’]
ul.tab {
width: 100%;
list-style: none;
padding-left: 0;
}
ul.tab li {
float: left;
height: 30px;
font-family:inherit;
vertical-align: middle;
color:inherit;
font-size:inherit;
text-align: center;
width: 33.3%;
padding: 0 10px;
background-color: #595b5b;
color: #fff;
cursor: default;
}
ul.tab li:hover {
background-color: #539fe1;
color: #fff;
}
ul.tab li.active {
background-color: #368bdc;
color: #fff;
}
div.tabContent {
clear: both;
width: 100%;
display: none;
}
div.active {
display: block;
}
[/open]
[/tl]
[/timeline]
XML(manifest.xml)
パネル名、拡張機能名がhelloworldのままだったので、Custom Panelに変更しました。
※ Photoshopを再起動しないと変更されません。

拡張機能のカスタムパネルのデータを外部参照する方法
こちらも応用編です。
拡張機能のカスタムパネルの内容を更新するときに
- hostscript.jsx
- main.js
- index.html
を変更して、それぞれの環境でデータを差し替えしていたのですが、手間なので外部参照してみました。
jsxの外部参照方法
#include "/C/Users/Namae/AppData/Roaming/Adobe/CEP/extensions/custompanel/jsx/hostscript.jsx"
というふうに参照先のパスを書くだけです。
参照先がさらにインクルードされていても、参照されます。
jsの外部参照方法
index.htmlに<script src="js/main.js"></script>と書かれている部分を
<script src="C:/Users/Namae/AppData/Roaming/Adobe/CEP/extensions/custompanel/js/main.js"></script>
というふうに参照先のパスを書くだけです。
htmlの外部参照方法
ここは手間取りました。
まずはinclude.js作成。
[open title=’include.js’]
function include(filename, afterfunc) {
    include.seq = (include.seq) ? include.seq + 1 : 1;
    var id = new Date().getTime() + "-" + include.seq;
    var inc = document.createElement("iframe");
    inc.id = "inc-" + id;
    inc.src = filename;
    inc.style.display = "none";
    document.write("<span id="" + id + ""></span>");
    var incfunc = function() {
        var s = (function() {
            var suffix = (n = filename.lastIndexOf(".")) >= 0 ? filename.substring(n) : "default";
            if (suffix == ".html") return inc.contentWindow.document.body.innerHTML;
            if (suffix == ".txt") return inc.contentWindow.document.body.firstChild.innerHTML;
            if (suffix == "default") return inc.contentWindow.document.body.innerHTML;
        })();
        var span = document.getElementById(id);
        var insertBeforeHTML = function(htmlStr, refNode) {
            if (document.createRange) {
                var range = document.createRange();
                range.setStartBefore(refNode);
                refNode.parentNode.insertBefore(range.createContextualFragment(htmlStr), refNode);
            } else {
                refNode.insertAdjacentHTML('BeforeBegin', htmlStr);
            }
        };
        insertBeforeHTML(s.split(">").join(">").split("<").join("<"), span);
        document.body.removeChild(inc);
        span.parentNode.removeChild(span);
        if (afterfunc) afterfunc();
    };
    if (window.attachEvent) {
        window.attachEvent('onload',
            function() {
                document.body.appendChild(inc);
                inc.onreadystatechange = function() {
                    if (this.readyState == "complete") incfunc();
                };
            });
    } else {
        document.body.appendChild(inc);
        inc.onload = incfunc;
    }
}
[/open]
あとはindex.htmlの中にインクルードするだけです。
[open title=’index.html’]
< !doctype html >
    < html >
    < head >
    < meta charset = "utf-8" >
    < link rel = "stylesheet"
href = "css/topcoat-desktop-dark.min.css" / >
    < link id = "hostStyle"
rel = "stylesheet"
href = "css/styles.css" / >
    < script type = "text/javascript"
src = "https://ajax.googleapis.com/ajax/libs/jquery/2.1.3/jquery.min.js" > < /script> < script >
    $(function() {
        $(".tab li").click(function() {
            var num = $(".tab li").index(this);
            $(".tabContent").removeClass('active');
            $(".tabContent").eq(num).addClass('active');
            $(".tab li").removeClass('active');
            $(this).addClass('active')
        });
    }); < /script> < title > < /title> < /head> < body class = "hostElt" >
    < ul class = "tab" >
    < li class = "topcoat-button--large hostFontSize active" > メニューA < /li> < li class = "topcoat-button--large hostFontSize" > メニューB < /li> < li class = "topcoat-button--large hostFontSize" > メニューC < /li> < /ul> < script type = "text/javascript"
src = "js/include.js" > < /script> < script type = "text/javascript" >
    include("C:/Users/Namae/AppData/Roaming/Adobe/CEP/extensions/custompanel/contents.html"); < /script>
[/open]
※中身の参照先contents.htmlの内容はindex.hemlの後半部分
