本記事ではおすすめのマクロとショートカット(アドイン)の作成方法を紹介します!
マクロを使うと作業の効率化になるので是非覚えておきましょう!
PowerPointのおすすめのマクロ 6選
実際に使ってみて、便利だったマクロを紹介いたします。
図形を固定するマクロ
どうして図形の固定機能がないのか?不思議ですがよく使うマクロです。
詳細はこちら。

グリッド線にスナップのON/OFFするマクロ
マクロでワンクリックで切り替えできるようにします。
Sub グリッド線に合わせる設定のオンオフを切り替える()
With ActivePresentation
.SnapToGrid = Not .SnapToGrid
End With
End Subグリッド線の表示のON/OFFするマクロ
マクロでワンクリックで切り替えできるようにします。
Sub グリッド線の表示を切り替える()
With Application
.DisplayGridLines = Not .DisplayGridLines
End With
End Sub複数のデータ(.pptx)を一つにまとめるマクロ
複数のパワポを取りまとめる時に便利です!

複数画像を1スライドずつ入れるマクロ
複数の画像を一気に挿入した時に便利です。
マクロから画像を選択、拡張子も選択すればOKです。
Sub ImageImport()
Dim cntL As Integer, cntT As Integer
Dim flgAspect As Boolean
Dim SL As Single, SR As Single, ST As Single, SB As Single
Dim ML As Single, MT As Single
Dim xlApp As Object
Dim dlgOpen As Variant
Dim myPre As Presentation
Dim Sld As Slide
Dim n As Long
Dim i As Integer, j As Integer
Dim sldWidth As Single, sldHeight As Single
Dim realWidth As Single, realHeight As Single
Dim myWidth As Single, myHeight As Single
Dim myLeft As Single, myTop As Single
Dim myPic As Shape
cntL = 2 '★横方向枚数2~6などで変更
cntT = 1 '★縦方向枚数2~6などで変更
flgAspect = True '★縦横比を固定するときはTrue,しないときはFalseで変更
SL = 0 'スライド左余白
SR = 0 'スライド右余白
ST = 0 'スライド上余白
SB = 0 'スライド下余白
ML = 0 '左右間隔
MT = 0 '上下間隔
Set myPre = ActivePresentation
With myPre
sldHeight = .SlideMaster.Height
sldWidth = .SlideMaster.Width
End With
realWidth = sldWidth - SL - SR
realHeight = sldHeight - ST - SB
myWidth = realWidth / cntL - ML
myHeight = realHeight / cntT - MT
Set xlApp = CreateObject("Excel.Application")
dlgOpen = xlApp.GetOpenFileName("gif,*.gif,jpg,*.jpg,jpg,*.jpeg,bmp,*.bmp,png,*.png,wmf,*.wmf,tiff,*.tiff", , , , True)
With myPre.Slides '新規スライド
j = 1
i = 1
Set Sld = .Add(.Count + 1, ppLayoutBlank)
End With
If IsArray(dlgOpen) Then
For n = LBound(dlgOpen) To UBound(dlgOpen)
If i > cntT Then 'さらに新規スライド
i = 1
With myPre.Slides
Set Sld = .Add(.Count + 1, ppLayoutBlank)
End With
End If
myLeft = SL + (j - 1) * realWidth / cntL
myTop = ST + (i - 1) * realHeight / cntT
Set myPic = Sld.Shapes.AddPicture _
(FileName:=dlgOpen(n), _
LinkToFile:=msoFalse, _
SaveWithDocument:=msoTrue, _
Left:=myLeft, Top:=myTop)
With myPic
.LockAspectRatio = flgAspect
.Height = myHeight
If flgAspect = False Then
.Width = myWidth
Else
If .Width > myWidth Then
.Width = myWidth
End If
End If
End With
If j < cntL Then '横にずらす
j = j + 1
Else '改行
j = 1
i = i + 1
End If
Next n
End If
xlApp.Quit
Set dlgOpen = Nothing
Set xlApp = Nothing
Set Sld = Nothing
Set myPre = Nothing
End Sub
画像を置換するマクロ
画像を差し替えるマクロです。
ここを起点に改良すると良さそうです。
<!-- wp:code -->
<pre class="wp-block-code"><code>Sub 画像置換()
Dim Pres As Presentation
Dim Sld As Slide
Dim shp As Shape
Dim l As Single
Dim t As Single
Dim h As Single
Dim w As Single
Dim strName As String
'画像のパス
Dim A As Variant
A = Array("C:Users\namae\Desktop1.png", "C:Users\namae\Desktop2.png", "C:Users\namae\Desktop3.png")
Dim idx As Integer
For Each Sld In ActivePresentation.Slides
For Each shp In Sld.Shapes
If shp.Type = msoPicture Then
l = shp.Left
t = shp.Top
h = shp.Height
w = shp.Width
strName = shp.Name
shp.Delete
Set shp = Sld.Shapes.AddPicture(A(idx), msoFalse, msoCTrue, l, t, w, h)
idx = idx + 1
If idx > UBound(A) Then idx = 0
shp.Name = strName
End If
Next shp
Next Sld
End Sub
</code></pre>
<!-- /wp:code -->マクロのアドインの作成方法
アドインは簡単にいうと独自のショートカットメニューの作成になります。
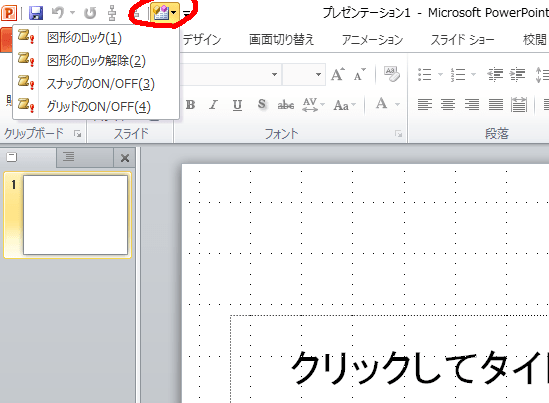
CallProcAddin.ppamとmacrodat.txtを入れてアドイン登録。
場所はC:Users\ユーザー名\AppData\Roaming\Microsoft\AddIns
マクロの入ったデータを名前を付けて保存から.ppamで保存してこちらもアドイン登録
macrodat.txtに読み込みたいアドインを入力。
lockShapes.ppam;図形のロック;lockShapes
unlockShapes.ppam;図形のロック解除;unlockShapes
gridSnap.ppam;スナップのON/OFF;gridSnap
displayGrid.ppam;グリッドのON/OFF;displayGrid上部のクイックアクセスツールバーからマクロを起動
ちなみにアドイン化すると使えなくなるマクロもあるので次のカスタムメニュー化をおすすめします。
好きなマクロを並べたカスタムタブメニューの作成方法
よく使うマクロはアドイン化していたのですが、たまにアドインにすると使えないマクロがあったので、違う方法を模索してみました。
Alt+F11でVBAを起動して好きなマクロを追加していきます。
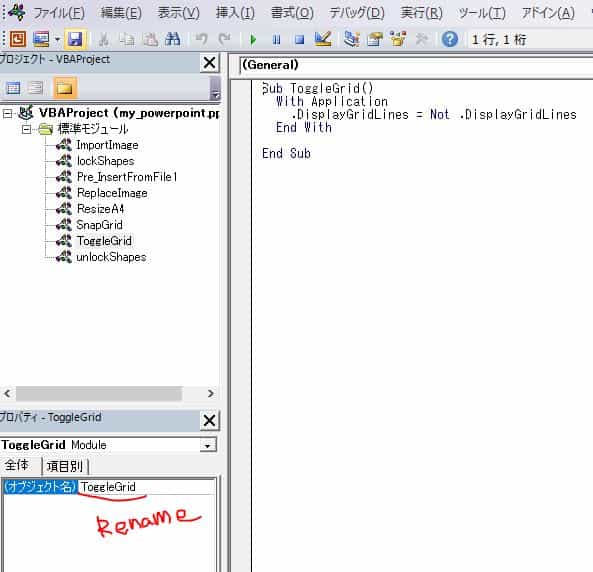
そもそもオフィスのデータはただのZIPデータだったりするので、拡張子をZIPにして解凍してしまいます。
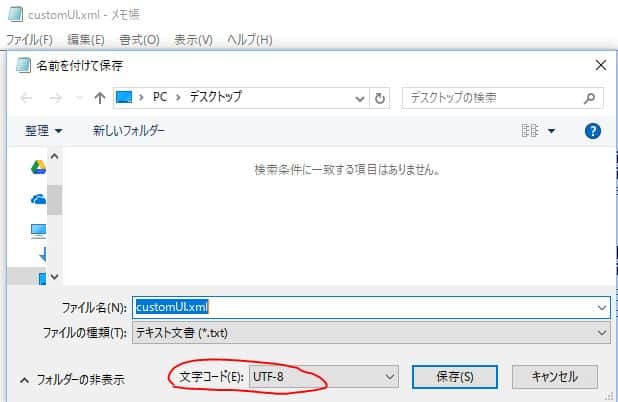
メモ帳を開いてタブメニューの記述を追加しcustomUI.xmlという名前で保存。
※このときUFT-8で保存しないと、最後にエラーを吐くので注意!
<?xml version="1.0" encoding="utf-8"?>
<customUI xmlns="http://schemas.microsoft.com/office/2006/01/customui">
<ribbon startFromScratch="false">
<tabs>
<tab id="MyTab1" label="my menu">
<group id="Group1" label="tool_01">
<button id="Button1-1" label="画像一括挿入" imageMso="MacroPlay" size="normal" onAction="ImportImage" />
<button id="Button1-2" label="画像一括置換" imageMso="MacroPlay" size="normal" onAction="ReplaceImage" />
<button id="Button1-3" label="複数pptを一つにまとめる" imageMso="MacroPlay" size="normal" onAction="Pre_InsertFromFile1" />
</group>
<group id="Group2" label="tool_02">
<button id="Button2-1" label="図形をA4にリサイズ" imageMso="MacroPlay" size="normal" onAction="ResizeA4" />
<button id="Button2-2" label="図形をロック" imageMso="MacroPlay" size="normal" onAction="lockShapes" />
<button id="Button2-3" label="図形のロック解除" imageMso="MacroPlay" size="normal" onAction="unlockShapes" />
<button id="Button2-4" label="グリッド表示ON・OFF" imageMso="MacroPlay" size="normal" onAction="ToggleGrid" />
<button id="Button2-5" label="グリッド吸着ON・OFF" imageMso="MacroPlay" size="normal" onAction="SnapGrid" />
</group>
</tab>
</tabs>
</ribbon>
</customUI>
できたら、customUIというフォルダを作成してその中にcustomUI.xmlを入れて、そのフォルダごと解凍したパワポデータの直下に入れます。
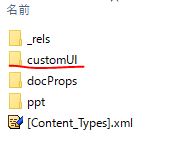
解凍したパワポデータに_relsというフォルダの中に.relsというデータがあるので、まずコピーをとってからメモ帳で開きます。(そのまま開くと読み取り専用になります)
<?xml version="1.0" encoding="UTF-8" standalone="yes"?>
<Relationships xmlns="http://schemas.openxmlformats.org/package/2006/relationships">
<Relationship Id="rId1" Type="http://schemas.openxmlformats.org/officeDocument/2006/relationships/officeDocument" Target="ppt/presentation.xml"/>
<Relationship Id="rId2" Type="http://schemas.openxmlformats.org/package/2006/relationships/metadata/thumbnail" Target="docProps/thumbnail.jpeg"/>
<Relationship Id="rId3" Type="http://schemas.openxmlformats.org/package/2006/relationships/metadata/core-properties" Target="docProps/core.xml"/>
<Relationship Id="rId4" Type="http://schemas.openxmlformats.org/officeDocument/2006/relationships/extended-properties" Target="docProps/app.xml"/>
<Relationship Id="myCustomUI" Type="http://schemas.microsoft.com/office/2006/relationships/ui/extensibility" Target="customUI/customUI.xml"/>
</Relationships>
最後に保存して、オリジナルの.relsへ上書き保存します。
UFT-8で保存しないと、最後にエラーを吐くので注意!
圧縮して元の名前に戻します。○○○.pptm
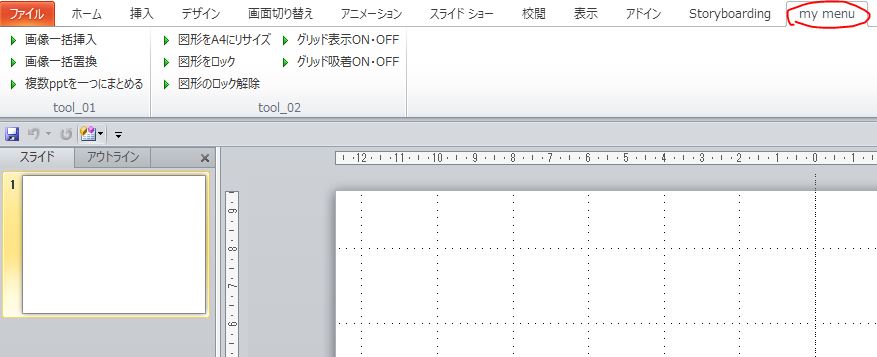
開いて、タブメニューを確認して完了です。
以上で、好きなマクロが簡単に使えるパワポファイルとして使えます。
まとめ
よく使うマクロをまとめてみましたので、是非一度試してみてください!

